What does one do when they have some boneless pork chops thawed and ready, but they also have some eggs to use up? That was the question last night...my answer was pork fried rice. I looked at a couple of recipes online just to get an idea of the process, then went to work. After a couple of mishaps with exploding oil, I think it went smoothly and turned out to be a delicious meal! The proportion of meat to rice was different than the recipes I looked at, but we decided we liked it that way...some pork and some rice in each bite! (I would have had to double the rice otherwise!)
Pork Fried Rice
1/2 c oil (I used a mix of sesame and olive oil)
3 boneless, skinless pork chops, cooked, finely diced (I used about 1/4 inch squares)
4 cups cooked rice, cooled
1 c frozen mixed vegetables
2 T soy sauce
1 t onion powder
2 eggs, beaten
Heat the oil to smoking in a thick skillet or a wok. You can use a cover to prevent major oil splatter. Add the cooked rice, and stir fry for 6 minutes. Add the pork and frozen vegetables, and heat for 5 minutes, or until vegetables are softened, stirring occasionally. Add the soy sauce and onion powder. Turn heat to high, and slowly pour in eggs. Stir to be sure eggs are distributed throughout the rice. Cook until egg whites turn white.
Thursday, December 3, 2009
Friday, October 30, 2009
Pumpkin Chocolate Chip Cookies
Every year at Halloween I make these...and every year, they go like hotcakes when I take them to work. This year was especially memorable...I decided to triple the recipe to use the whole can of pumpkin, and the amount of cookie dough in the stand mixer covered the beater! It took 3.5 hours to finish making the cookies, 7 batches later. (oops) Needless to say, everyone else benefits from the mass-cookie-giveaway! These are a little bit pumpkin pie, a little bit cake, a little bit chocolate chip cookie. All-in-all, a delicious Halloween snack.
Pumpkin Chocolate Chip Cookies
1 c canned pumpkin
1 c white sugar
1/2 c vegetable oil
1 egg
2 c all-purpose flour
2 t baking powder
2 t ground cinnamon
1/2 t salt
1 t baking soda
1 t milk
1 T vanilla extract
2 c semisweet chocolate chips
1. Preheat oven to 350 degrees. Combine pumpkin, sugar, vegetable oil, and egg. In a separate bowl, stir together flour, baking powder, ground cinnamon, and salt. Dissolve the baking soda with the milk and stir into dry ingredients. Add flour mixture to pumpkin mixture and mix well.
2. Add vanilla and chocolate chips.
3. Drop by heaping spoonful on greased cookie sheet and bake for approximately 10 minutes or until lightly brown. (cookies will be slightly soft, but will no longer be shiny)
makes ~2 dozen medium sized cookies
Monday, October 26, 2009
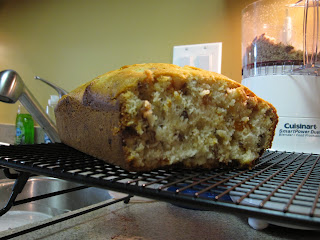
Apricot, Pecan, & White Chocolate Bread
I recently took a very important licensing exam. I studied several months in preparation for this exam, and had very little free time. As soon as I was home from the exam, I wanted to bake. I wasn't sure what, but I came across this recipe and thought the apricot would be appropriate for the upcoming Halloween festivities. This bread turned out to be so delicious that my nearly 89-year old grandmother said it was "the best ever"! Despite the chocolate, it was definitely not too sweet...the apricots are a little tart, the chocolate a bit sweet, and the pecans balance it all out. Bring this to the next family gathering, and everyone will love you (even more)!
Apricot, Pecan, & White Chocolate Bread
1/2 c snipped dried apricots
2 c all-purpose flour
1 c sugar
1 T baking powder
1/2 t salt
1 egg, lightly beaten
1 c milk
1/4 c cooking oil
1/2 c chopped toasted pecans
1/2 c white chocolate baking pieces
1. In a small bowl, combine dried apricots and enough boiling water to cover. Let stand for 15 minutes, then drain.
2. Meanwhile, preheat oven to 350 degrees. Grease a 9x5x3 loaf pan (or use foil as the original recipe calls for). In a large bowl, combine flour, sugar, baking powder, and salt. Make a well in the center of the flour mixture; set aside.
3. In a medium bowl, combine egg, milk, and oil. Add liquids all at once to flour mixture. Stir just until moistened (may still be lumpy). Fold in pecans, baking pieces, and drained apricots. Spoon batter into the prepared pan.
4. Bake 60-65 minutes or until a toothpick inserted near the center comes out clean.
5. Cool bread completely on wire rack (may cool 10 min in pan before removing). Wrap and store until serving. Slice and enjoy!
Wednesday, October 14, 2009
Salmon Adventures, Part IV (Honey Mustard Salmon)
Well, it's been a hectic few weeks here, with under two weeks until my big exam! Somehow, we managed to try another recipe for salmon. It turned out really well, although it might have been even better had we actually had honey dijon mustard! (we had to use honey and dijon) I love the way the bread crumbs held the flavor on for baking. Delicious, and very easy!
Honey Mustard Salmon
4-4 oz salmon fillets
3 T honey dijon mustard
salt and pepper to taste
1/4 c Italian style bread crumbs
1/4 c melted butter
1. Preheat oven to 400 degrees. Line a shallow baking pan with foil for easy cleanup. (If you don't use nonstick spray, the skin should stick to the foil so you can serve just the fillet.)
2. Place the fillets skin side down in the baking pan, and spread with a thin layer of the honey dijon mustard.
3. Season with salt and pepper if desired. Cover with Italian bread crumbs.
4. Drizzle with butter before placing in the oven for 15 minutes or until the salmon flakes easily with a fork.
Friday, September 25, 2009
Salmon Adventures, Part III (Tsatsiki Salmon)
My mom sent me a salmon recipe a couple of months ago, and we finally got around to trying it. This one was very simple and delicious, and well worth the wait. The salmon was basically prepared plain, then served with the tsatsiki sauce. Yum!
Tsatsiki Salmon
3/4 cup cubed, seeded, peeled cucumber
1 cup fat-free sour cream or yogurt
1 T chopped green onions or chives
1/4 t dried dill
1 t lemon juice
1/4 t salt
4 salmon filets
salt and pepper to taste
Combine first 6 ingredients in small bowl. Cover and chill 30 minutes.
Sprinkle fish with salt and pepper. Place fish, skin side up, on grill rack coated with cooking spray. Grill 6 minutes. Turn fish over, grill 4 more minutes.
Serve with sauce on the side.
***Note-May also add 1/2 teaspoon horseradish before chilling for a little extra kick!
Thursday, September 24, 2009
Beef and Bean Enchilada Casserole
I made enchiladas a couple of months ago, and we loved them! They take awhile, by the time you boil and "pull" the chicken, so I wanted to give this a try...fast, easy enchilada flavor. Plus, who doesn't like a good casserole when the weather cools? This was a delicious meal! I customized it a little bit by using black beans instead of pinto beans and leaving out the onions (blech). The flavor was very mild with the sour cream. Next time I might cut back a little on the sour cream just to add more punch, but it was just fine this way, too! I will aslo remake this using chicken. It would be great with any meat! I found the recipe here.
Beef and Bean Enchilada Casserole
1/2 lb lean ground beef
1/2 c chopped onion (I left this out and didn't miss it)
1 tsp chili powder
1/2 tsp ground cumin
1 15 oz can black beans (or pinto), drained and rinsed
1 4 oz can diced green chili peppers
1 8 oz carton sour cream or light sour cream (less if desired)
2 Tbsp all-purpose flour
1/4 tsp garlic powder
8 6-in corn tortillas
1 10 oz can enchilada sauce (or 1 10-1/2 oz can tomoato puree)
1 c shredded cheddar cheese
1. In a large skillet, cook the ground beef, onion, chili powder, and cumin unti meat is no longer pink and onion is tender. Drain. Stir in beans and undrained chili peppers. Set aside.
2. In a small mixing bowl, stir together sour cream, flour, and garlic powder until combined. Set aside.
3. Place half of the tortillas in the bottom of a lightly greased 2-quart rectangular baking dish, cutting to fit if necessary. Top with half of the meat mixture, half of the sour cream mixture, and half of the enchilada sauce. Repeat layers. Cover dish with plastic wrap and chill in refrigerator for up to 24 hours.
4. To finish and serve: Preheat oven to 350 degrees. Remove plastic wrap; cover dish with foil. Bake in preheated oven for 35-40 minutes or until bubbly. Uncover; sprinkle with cheese and bake 5 additional minutes.
Makes 6-8 servings.
Monday, September 7, 2009
Chocolate Glazed Donut Muffins
My cousin invited us to a brunch for the long Labor Day weekend. I always feel empty-handed unless I bring something, but I figured they'd have all the main food...what to bring? A no-brainer, once I saw this recipe here! It's like the joy of a donut without the deep-fried ugliness! They turned out really well, and the only change I might make would be to put less dough in the muffin tins to increase the ratio of "glaze" to "donut". You'll want to try this one with a glass of milk!
Chocolate Glazed Donut Muffins
2 cup flour
1 cup sugar (slightly less)
1 T baking powder
1 t salt
1/4 t Allspice
1/4 tsp nutmeg
2 eggs
1/4 cup canola oil
1/4 cup melted butter
3/4 cup milk
1 tsp vanilla extract
Heat oven to 350 degrees.
Sift the dry ingredients together in a large bowl.
In a separate bowl, combine the eggs, oil, butter, milk and vanilla. Add to dry ingredients, combining gently until smooth.
Grease the muffin pans. Divide the batter between the muffin cups.
Bake for about 18 minutes or until a toothpick comes out clean.
Cool in pan on rack for about 5 minutes, then turn on out on rack to cool. Cool completely before glazing.
Chocolate Glaze
1/2 cup (3 ounces) semisweet chocolate chips
2 tablespoons (1 ounce) butter
1 tablespoon plus 1 teaspoon light corn syrup
1/4 teaspoon vanilla extract
Melt the ingredients together in a heat-safe glass bowl over a pot of simmering water, stirring often.
Pour glaze into small, shallow bowl. Dip muffin tops in glaze and set upright. Decorate with sprinkles, if desired, while glaze is still sticky. Let sit until glaze firms. Enjoy!
Tuesday, September 1, 2009
Better-than-Brownies Chocolate Cookies
I had a fun girls' getaway planned with my best friend, and I wanted to make some treats to bring with. It turns out, I only had time to make one, but it was SOOOOO worth it! This cookie has everything going for it...lots of rich chocolate flavor, soft brownie texture, and melted chocolate goodness! Warning: You Cannot Possibly Eat Just One! Be sure you've got a glass of milk nearby, 'cause this one's rich! I found the recipe here, and wouldn't change a thing.
Better-than-Brownies Chocolate Cookies
Makes 24 large cookies
2-2/3 cups (about 16 ounces) bittersweet chocolate, chopped
4 tablespoons unsalted butter, at room temperature
4eggs
1-1/3 cups granulated sugar
1 teaspoon vanilla extract
½ cup all-purpose flour
½ teaspoon baking powder
1 cup semisweet or bittersweet chocolate chips
1. Preheat the oven to 350°F. Line two large baking sheets with parchment paper or a silicone baking mat.
2. Put the chocolate and butter in a heatproof bowl and set it over a saucepan of barely simmering water, stirring occasionally, until completely melted and smooth.
3. In the meantime, stir together the eggs, vanilla and sugar in a medium bowl. Set aside.
4. In a small bowl, sift together the flour and baking powder.
5. Add the melted chocolate mixture to the egg mixture and stir to combine well. Slowly add the dry ingredients, folding them into the batter. Once all of the flour is incorporated, stir in the chocolate chips.
6. Scoop 1½ tablespoons of dough (a medium cookie scoop’s worth) onto prepared baking sheets. Bake for 10-12 minutes or until they are firm on the outside. Like brownies, do not overbake! Leave to cool completely on the baking sheets.
Thursday, August 20, 2009
Salmon Adventures, Part II (Blackened Salmon Fillets)
So, we finally got around to another salmon recipe. (See Salmon Adventures post). There was one new recipe in the middle made by the hubby, but we both agreed it was not too tasty. So, technically this Part II is really Part II.5. This recipe was the only one I could find that only involved things in the pantry. I was worried about masking the delicious flavor of the salmon, but it had to be done. It smelled great and tasted fantastic! The spicy flavor was perhaps a little too much for both the hubby and myself, so we will tone down the original recipe next time as shown below.
Blackened Salmon Fillets
2 tablespoons ground paprika
1/2 tablespoon ground cayenne pepper
1/2 tablespoon onion powder
2 teaspoons salt
1/2 teaspoon ground white pepper
1/2 teaspoon ground black pepper
1/4 teaspoon dried thyme
1/4 teaspoon dried basil
1/4 teaspoon dried oregano
4 salmon fillets, skin and bones removed
1/4 cup unsalted butter, melted
1. In a small bowl, mix paprika, cayenne pepper, onion powder, salt, white pepper, black pepper, thyme, basil and oregano.
2. Brush salmon fillets on both sides with 1/4 cup butter, and sprinkle evenly with the cayenne pepper mixture. Drizzle one side of each fillet with 1/2 remaining butter.
3. In a large, heavy skillet over high heat, cook salmon, butter side down, until blackened, 2 to 5 minutes. Turn fillets, drizzle with remaining butter, and continue cooking until blackened and fish is easily flaked with a fork.
Wednesday, August 19, 2009
Pioneer Woman's Baked Mac & Cheese
Disclaimer: I am from Wisconsin, and I LOVE cheese.
Don't let that affect your opinion of this dish, though. It is delicious! (Just ask my husband). It makes a LOT of macaroni, so we were eating it off and on for almost a week. Luckily, it reheats very well! This is a good compromise on kid-friendly comfort food with a very adult twist. This would go really well with ham, if you don't want this to be your main dish. The original recipe can be found here.
Macaroni & Cheese
Preheat oven to 350 degrees
4 cups dried macaroni
1/4 cup (1/2 stick, 4 tablespoons) butter
1/4 cup all-purpose flour
2 1/2 cups whole milk
2 heaping teaspoons dry mustard (more if desired)
1 egg, beaten
1 pound cheese, grated
1/2 teaspoon salt (more to taste)
1/2 teaspoon seasoned salt (more to taste)
1 teaspoon ground black pepper
(optional) dashes of: cayenne pepper, paprika, thyme
Cook macaroni just until very firm. Drain and set aside.
In a large pot, melt the butter and whisk in flour. Cook for five minutes over medium-low heat, whisking constantly and being careful not to burn. Pour in milk and add mustard. Whisk until smooth. Cook 5 minutes or until very thick. Reduce heat to low.
In a small bowl, beat egg. Temper the egg by slowly adding 1/4 cup of the warm sauce, whisking constantly until smooth. Pour the egg mixture back into the sauce, whisking constantly until smooth.
Add cheese, and stir to melt. Add salt, pepper, and spices until seasoned to taste. Add drained cooked macaroni to the pot and stir to combine.
Pour into a buttered baking dish, top with extra cheese, and bake for 20 to 25 minutes or until bubbly and golden on top.
Zucchini Ravioli Lasagna
This is a great recipe that I stumbled upon and was instantly intrigued by. Historically, I haven't been a huge fan of lasagna, but that changed the minute I tasted this. First of all, the preparation was (I think) much easier than a traditional lasagna. Then you add zucchini and it takes it over the top! I found the original recipe here, and I wouldn't change much about it, except maybe adding an extra zucchini. Perfection.
Zucchini Ravioli Lasagna
2-3 medium zucchini, cut lengthwises into 1/4-inch thick slices
1 pkg (26 oz) frozen large cheese ravioli
3 t olive oil
1 small onion, chopped
8 oz lean ground beef
1 jar (26 oz) tomato-basil sauce
1 c shredded part-skim mozzarella cheese
1/4 c freshly grated Parmesan cheese
1. Preheat oven to 375 degrees. Line cookie sheet with paper towels. Grease 2-quart ceramic baking dish (or 9x13).
2. Heat large covered pot of water to a boil over high heat. Add zucchini and cook 5 minutes. With tongs or slotted spoon, remove zucchini and lay out on prepared cookie sheet to drain. Return water to boiling, and add ravioli. Cook until ravioli rise to top (see package for approx time).
3. Meanwhile, in a large saucepan, heat 2 t oil over medium heat. Add onion and cook 8-10 minutes or until tender and lightly browned. Transfer to small bowl. In the same saucepan, add remaining oil and cook beef over medium-high heat 3-4 minutes or until browned, breaking up beef with spoon. Stir in tomato sauce and onion. Heat to boiling.
4. Drain ravioli; return to saucepot. Add meat sauce to ravioli and stir until combined.
5. In prepared baking dish, arrange half the zucchini; top with ravioli (arrange as carefully or randomly as you prefer); sprinkle with half the mozzerella and half the Parmesan. Repeat layers. Bake 20 minutes or until hot in the center and golden and bubbly on top.
Thursday, August 13, 2009
Salsa Chicken
This quick and simple recipe came from my mom, the original master of all things kitchen. It went together really quickly and had a nice hint of sweetness. The salsa chicken is only as spicy as the taco seasoning you add, so don't be afraid of it! Or, if you like a little extra kick to your dinner, I would recommend adding a sprinkle of cayenne. It would go really well with some rice! I ended up substituting grape jelly for the apricot preserves, since it's what was in the fridge...and it was delicious!
Salsa Chicken
1-1/4 lb boneless, skinless chicken breast, cut in strips
2 T oil for cooking
1 pkg taco seasoning
1/3 c apricot or peach preserves (or whatever you have)
1 can (14.5 oz) diced tomatoes
In a resealable plastic bag, toss chicken with taco seasoning to coat. Heat the oil in a large skillet, and cook the chicken 5-6 minutes or until done. Stir in tomatoes and preserves. Cover, and simmer for 10 minutes.
Friday, August 7, 2009
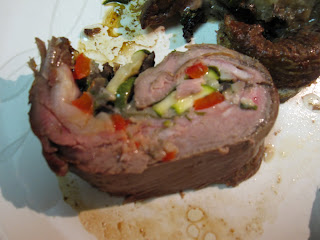
Rolled Flank Steak
This is one you have got to try. It's got something for everyone: steak, cheese, veggies...and it all comes together for one tasty meal. It presents nicely, too! (I know, I need to start adding pictures...in time!) The original recipe can be found here. The one minor comment I had regarding the original is that with the soy marinade and the bacon, it is a pretty salty taste (I had even used low-sodium soy sauce). It was a very good taste even still, but I think next time I might try turkey bacon to see if it cuts down on the saltiness. The other change I made was cutting the steak in two. It was a failed attempt at butterflying, but it turned out well. I ended up with 2 smaller rolls, and they cooked perfectly.
Seriously, this is one that is worth the splurge for some flank steak. I promise!
Seriously, this is one that is worth the splurge for some flank steak. I promise!
Rolled Flank Steak
2 lb butterflied flank steak
1/4 c soy sauce
1/2 c oil
8 slices thin provelone
6 strips thick cut bacon
1/2 red bell pepper, thinly sliced
1 small zucchini, thinly sliced
spinach
sliced mushrooms
Marinate the steak in the soy sauce and oil for 4 hours.
Lay the steak on the counter, with the grain running horizontally (not away from you). Layer the steak with the provelone, bacon, spinach, and veggies. Roll steak away from you so the side is a pinwheel. Tie with twine every 2 inches. (I didn't have twine, so I used skewers to hold it together). Cook in a greased 9x13 baking dish at 350 for 1 hour, or until 145 degrees. Let the steak rest for 5-10 minutes before cutting into 1-inch pinwheels to serve.
Wednesday, August 5, 2009
Beer Burgers!
Last night, we had a taste for burgers...but not just any burgers. We wanted something different. Something worthy of sitting on a plate with the sweet potato fries we made. This burger had to be...the beer burger! We threw some beer-sauteed mushrooms and some swiss cheese on the top, and dinner was served! My husband tried one burger with dijon mustard and one with barbecue sauce. Barbecue sauce definitely won his vote!
The original recipe for "Zippy Burgers" was found online here. I did not like all the chili powder, and will experiment next time with other seasonings.
Beer Burgers
1 lb ground beef
1/4 c beer
1/2 t crushed red pepper flakes
2 T Worcestershire
1 t onion powder
1/4 t salt
1/4 t pepper
Seasoning to taste (I may try cayenne next time)
Mix all ingredients except the beef. Add the beef and mix well. Form 4 patties, and grill to taste. Top with sauteed mushrooms and swiss, and barbecue sauce if desired (mozzerella would taste excellent on this as well). Enjoy!
Saturday, July 18, 2009
Salmon Adventures Part I (Salmon Tango)
Over the long weekend of the 4th of July, my husband and I were in Door County, Wisconsin with some family. While there, we took a charter fishing trip on the Bay side. We came home with a freezer full of fresh lake salmon! We made a deal to not use any previous recipes for salmon when baking our haul (and we definitely had some good favorites), or to repeat any new recipes we try. Salmon Round 1 was mine. I chose a recipe I found online here for Salmon Tango. I have no idea where the name came from, but we both thought it was delicious. It was a very simple recipe and flavor, but allowed the salmon to shine. I highly recommend it! Note: I made mine in the oven on a foil-lined baking pan, which worked great.
Salmon Tango
1/4 c melted butter
1/4 c brown sugar
1 T soy sauce
2 T lemon juice
2 T white wine
1-1/4 lb salmon fillets
Salmon Tango
1/4 c melted butter
1/4 c brown sugar
1 T soy sauce
2 T lemon juice
2 T white wine
1-1/4 lb salmon fillets
Directions
1. In a medium glass bowl, mix together butter, brown sugar, soy sauce, lemon juice and white wine.
2. Place salmon fillets in a large resealable plastic bag, and cover with marinade. Marinate in the refrigerator at least 1 hour, turning once.
3. Preheat an outdoor grill for high heat, and lightly oil grate.
4. Grill salmon fillets 6 to 8 minutes, turning once, until easily flaked with a fork. Baste with marinade while grilling.
Subscribe to:
Posts (Atom)